Using Scripting to Provision Cloud Infrastructure - A Terraform Perspective
An efficient way to provision cloud infrastructure


Table of contents
- What was I working on?
- Let me explain the Scenario:
- What is IAC (Infrastructure as Code):
- Why did I choose terraform:
- What you are gonna see in the next section:
- Spinning a Sample Instance:
- Terraform Basics:
- Steps involved:
- 1.Defining the configuration.
- 2.Initiate the terraform modules:
- 3. Validate the Configuration:
- 4. Apply the Configuration:
- 4. Verifying the Instances:
- 5.Destroy the Instances:
- Spinning a Spot instance:
- Background study:
- Code to provision Spot instance without any additional software:
- Result after execution of above commands:
- What I have done from here?
- Inference ~
PermalinkWhat was I working on?
Hello, everyone! This article will provide an introduction to Terraform and will discuss its significance in my current thesis project. To provide a bit more background, I am a Computer Science Graduate student from the University of Lethbridge Canada.
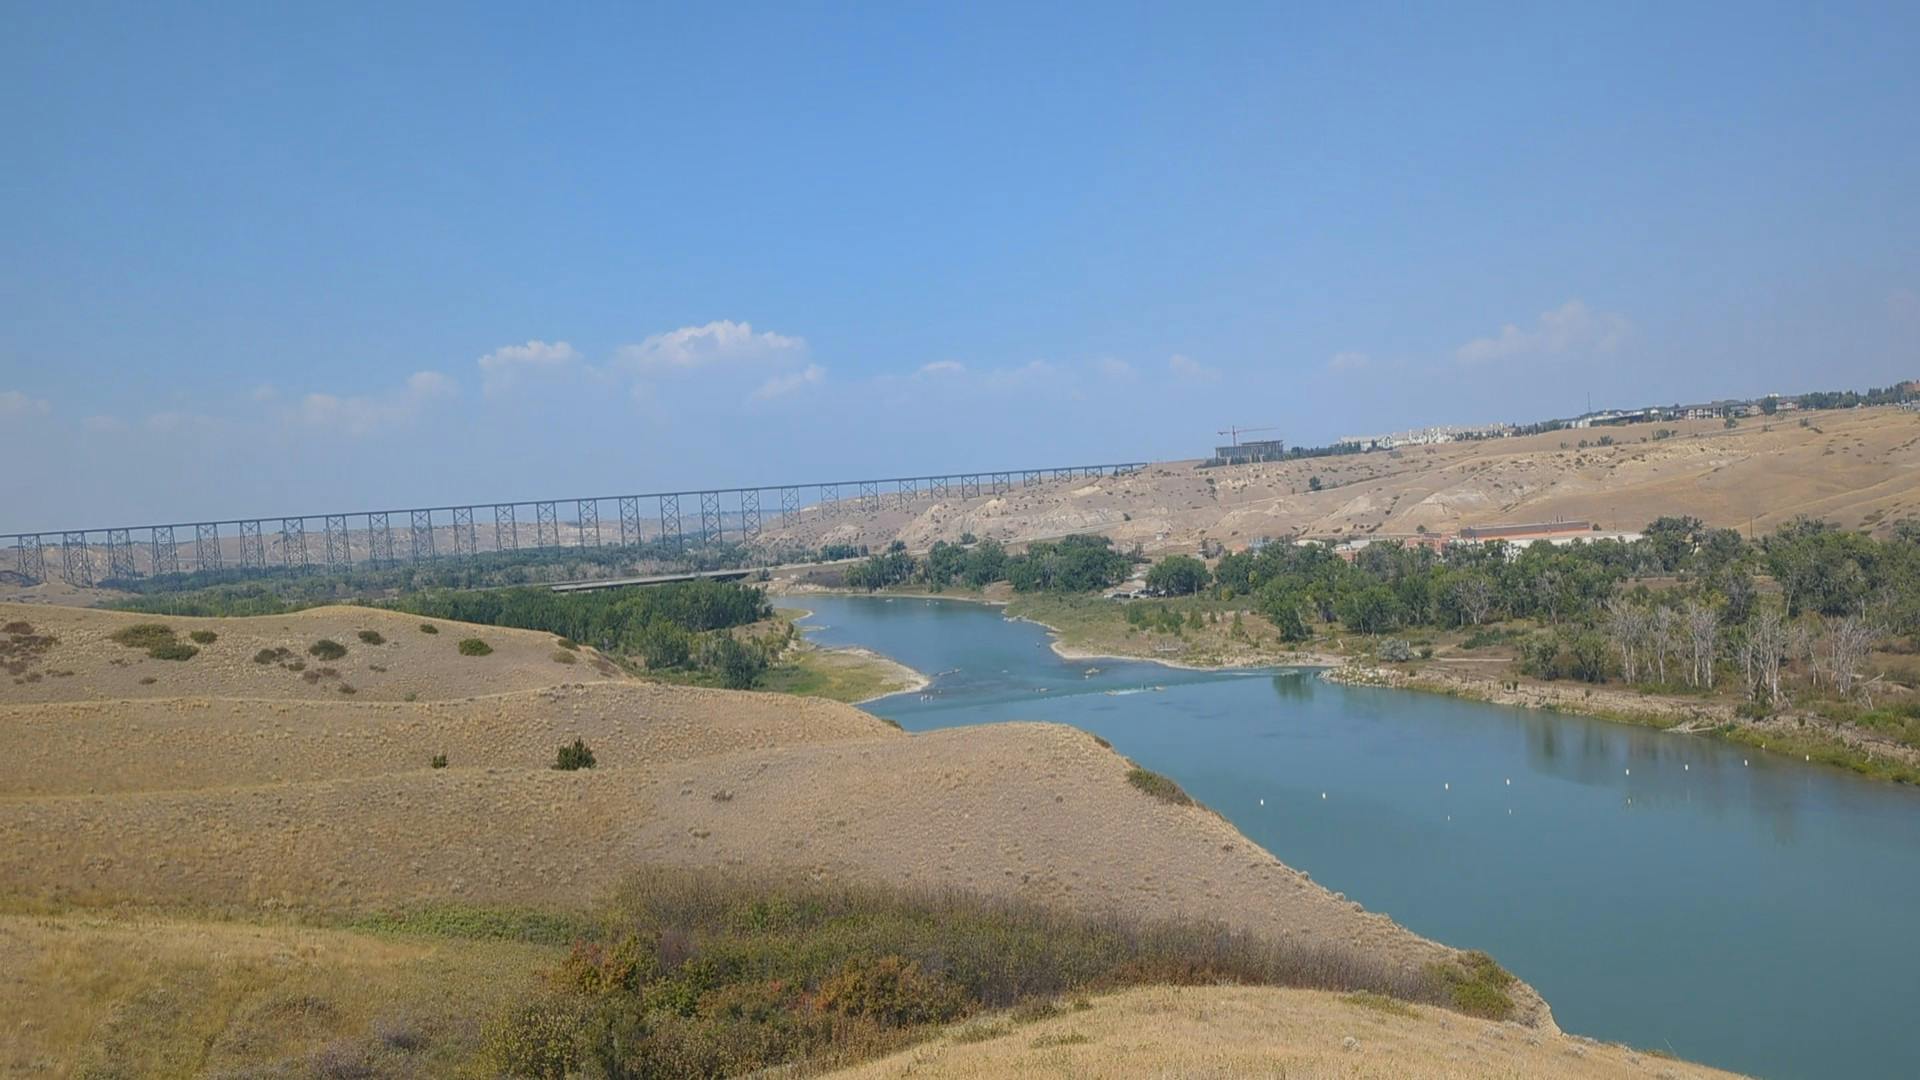
This is a picture of a river and railway bridge from the backside of my office. Btw it's a nice hiking spot, especially in summer.
PermalinkLet me explain the Scenario:
From the beginning of the thesis project, I was creating new cloud instances on the AWS Cloud(Amazon Web Services) platform using the web form that resembles the below image.
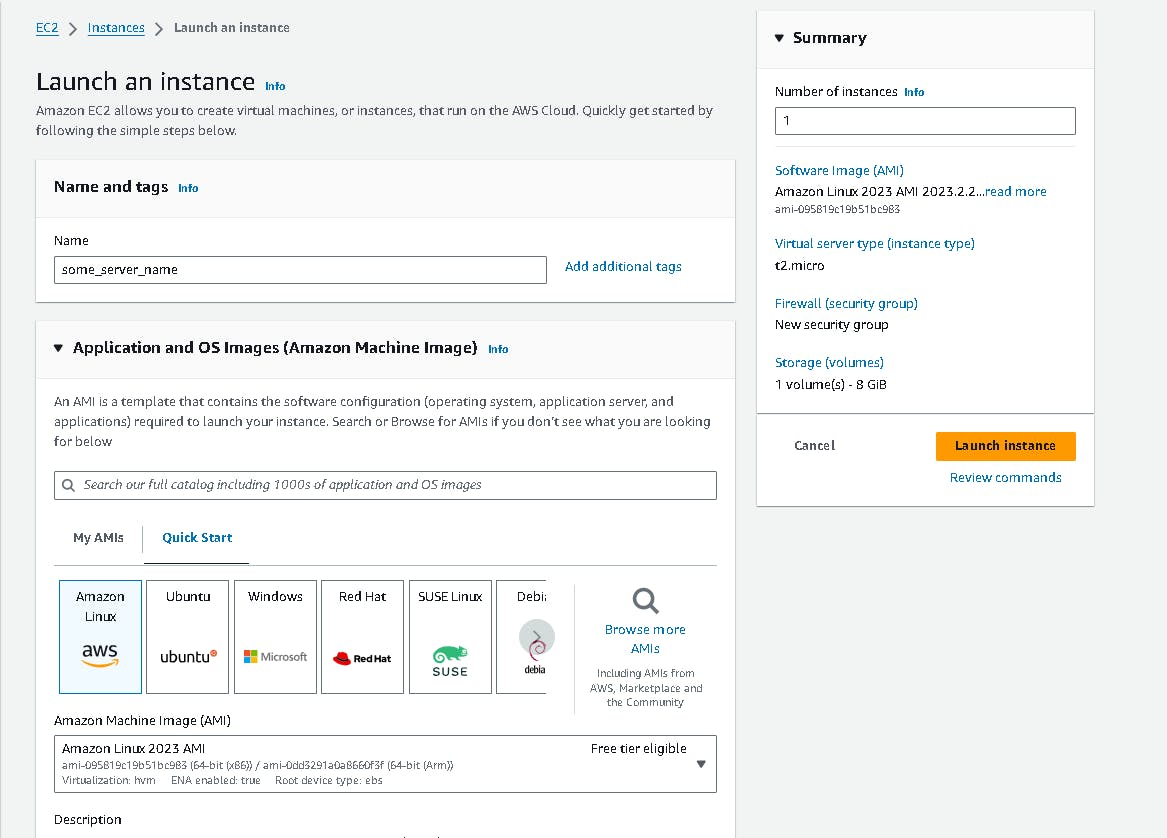
Image 1: Snapshot taken from the AWS cloud
Provisioning Cloud instances via the web form approach is acceptable particularly when we are using AWS for small-scale workloads. In a few projects sometimes the provisioning quantity is very frequent and the process requires some sort of automation to provision and handle new instances. Also, every time an instance is terminated the configuration and the software installed on that instance is completely lost. Due to this problem whenever I was trying to have new instances with the previously installed software, I was repeating every installation step on the cloud instance which was frustrating. Therefore, I decided to put a full stop to this problem, by using scripting and automating the state of instances by backing up the AMI (Amazon Machine Image).
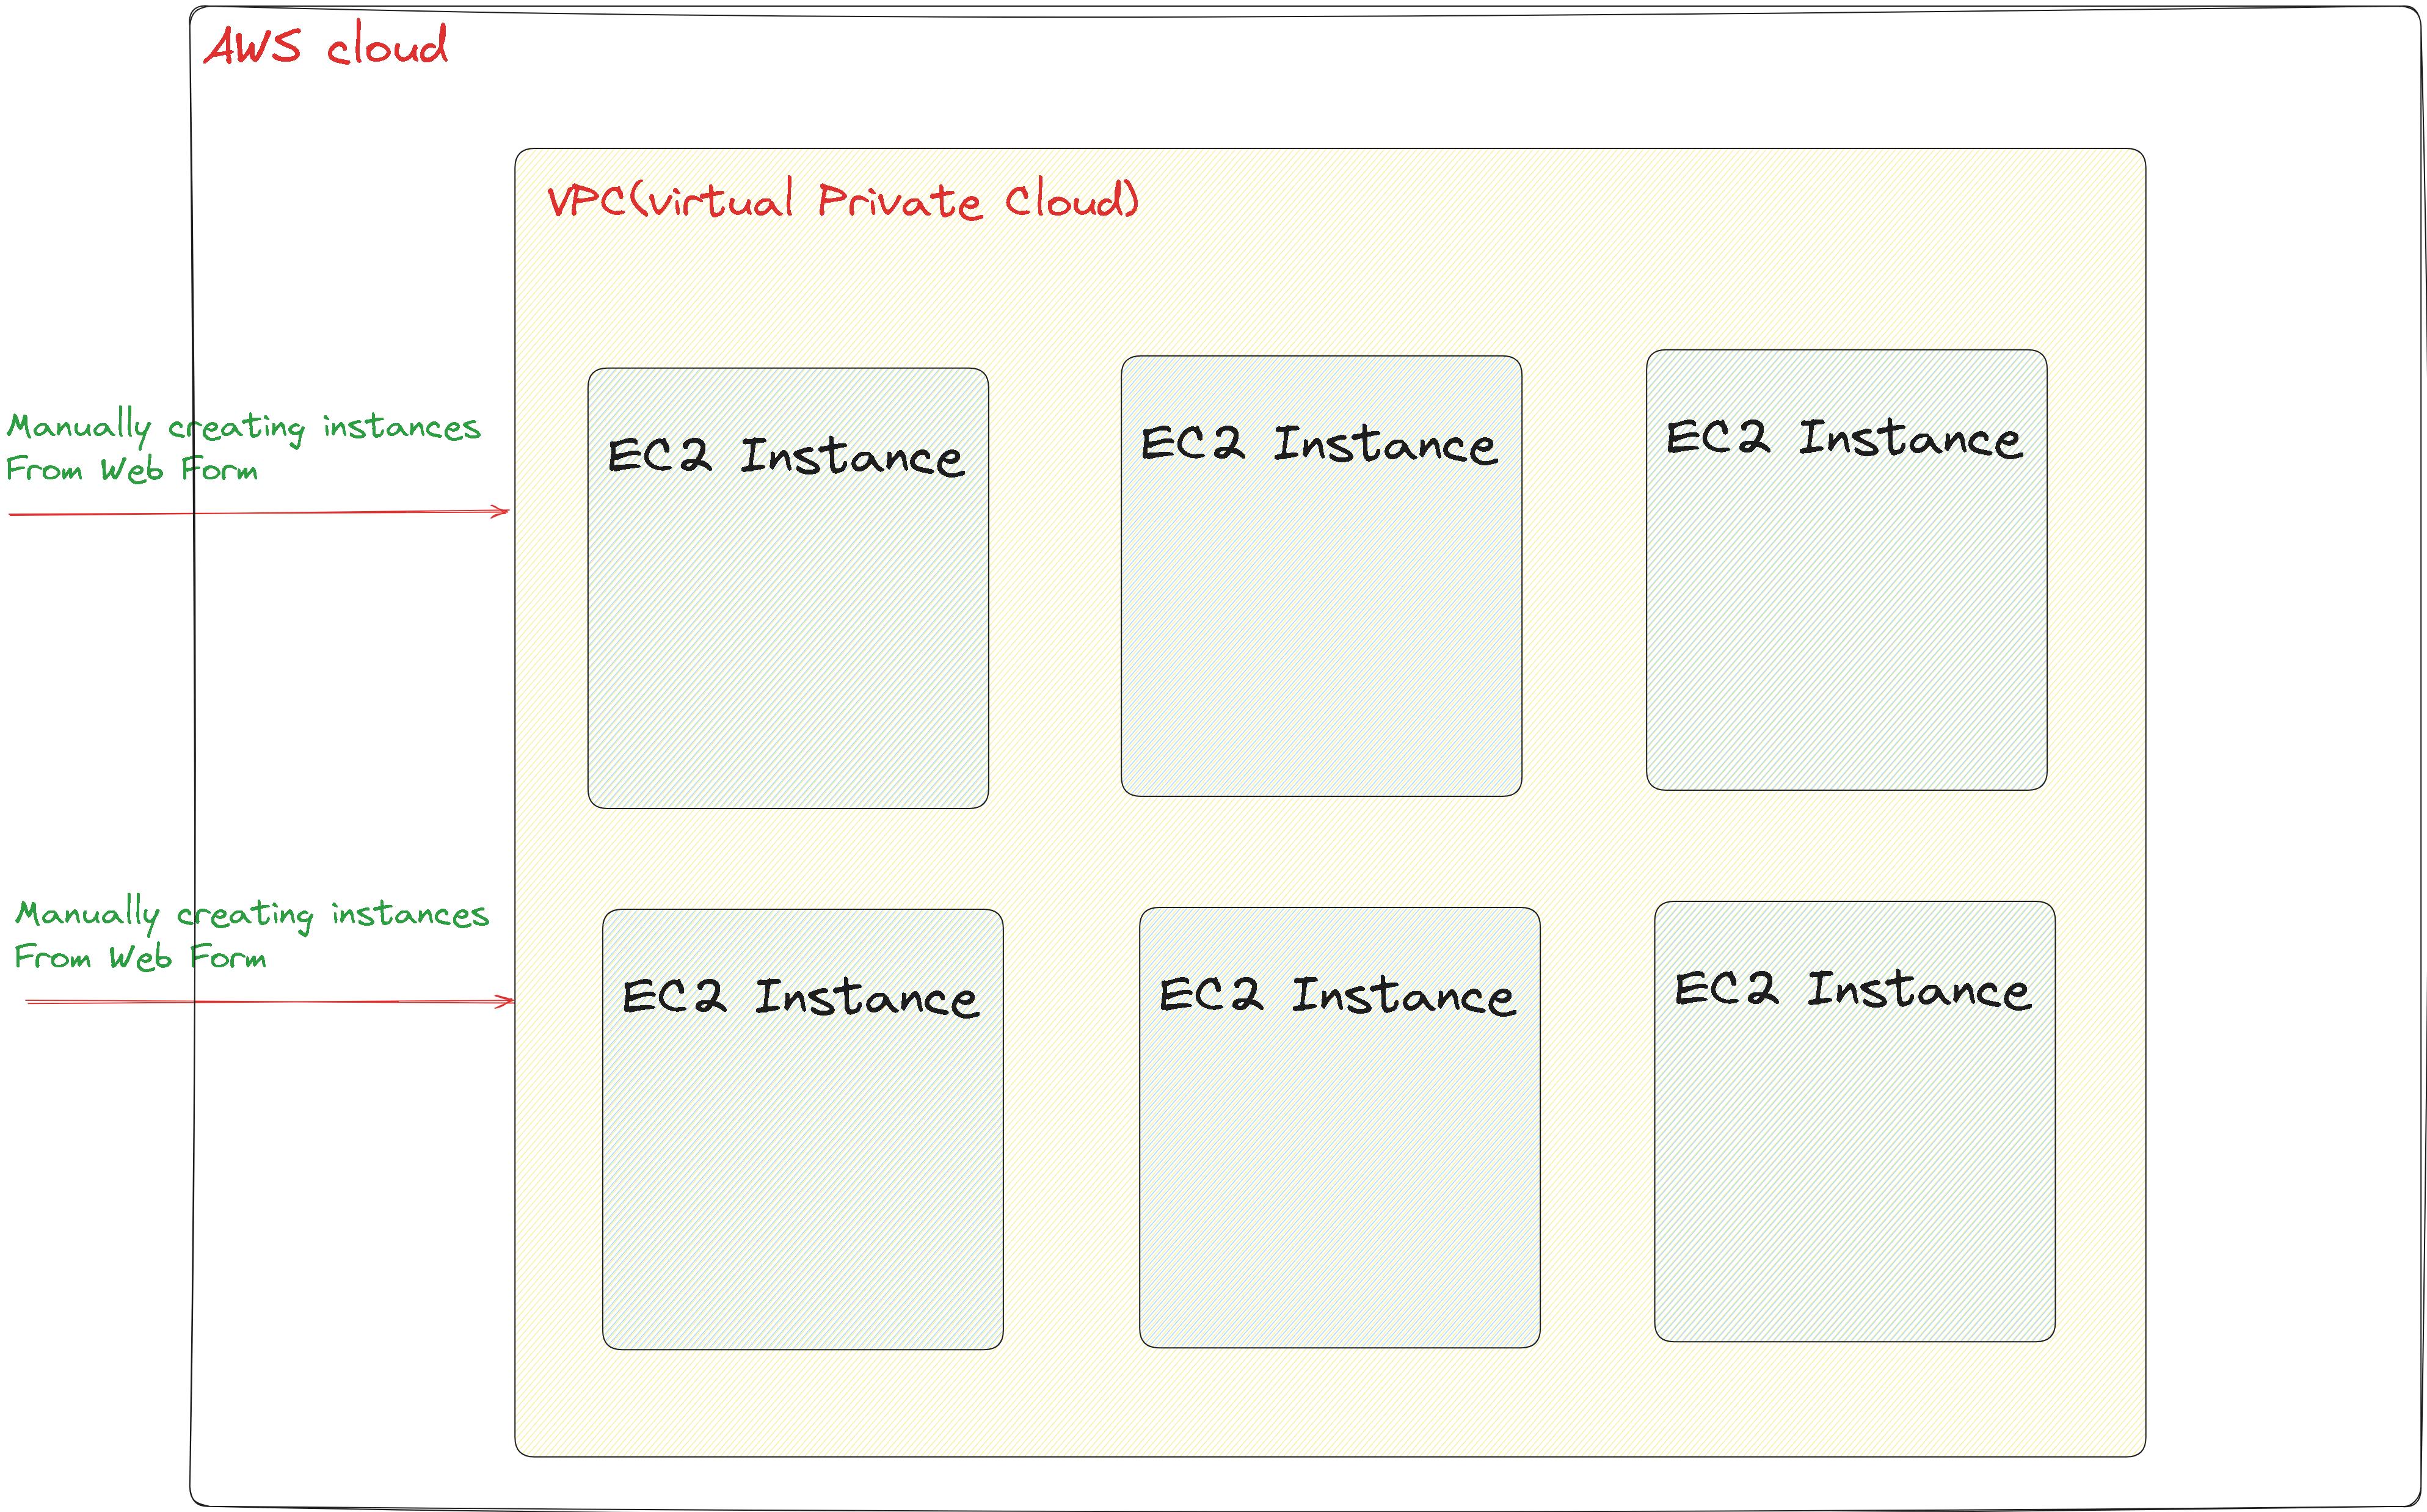
Image 2: Manual approach that I was following to create instances.
This methodology doesn't help us when we are creating various instances for experimentation and testing purposes in an intensive project environment. In Figure 3, we can see an architectural diagram, that helps in provisioning instances and configuring
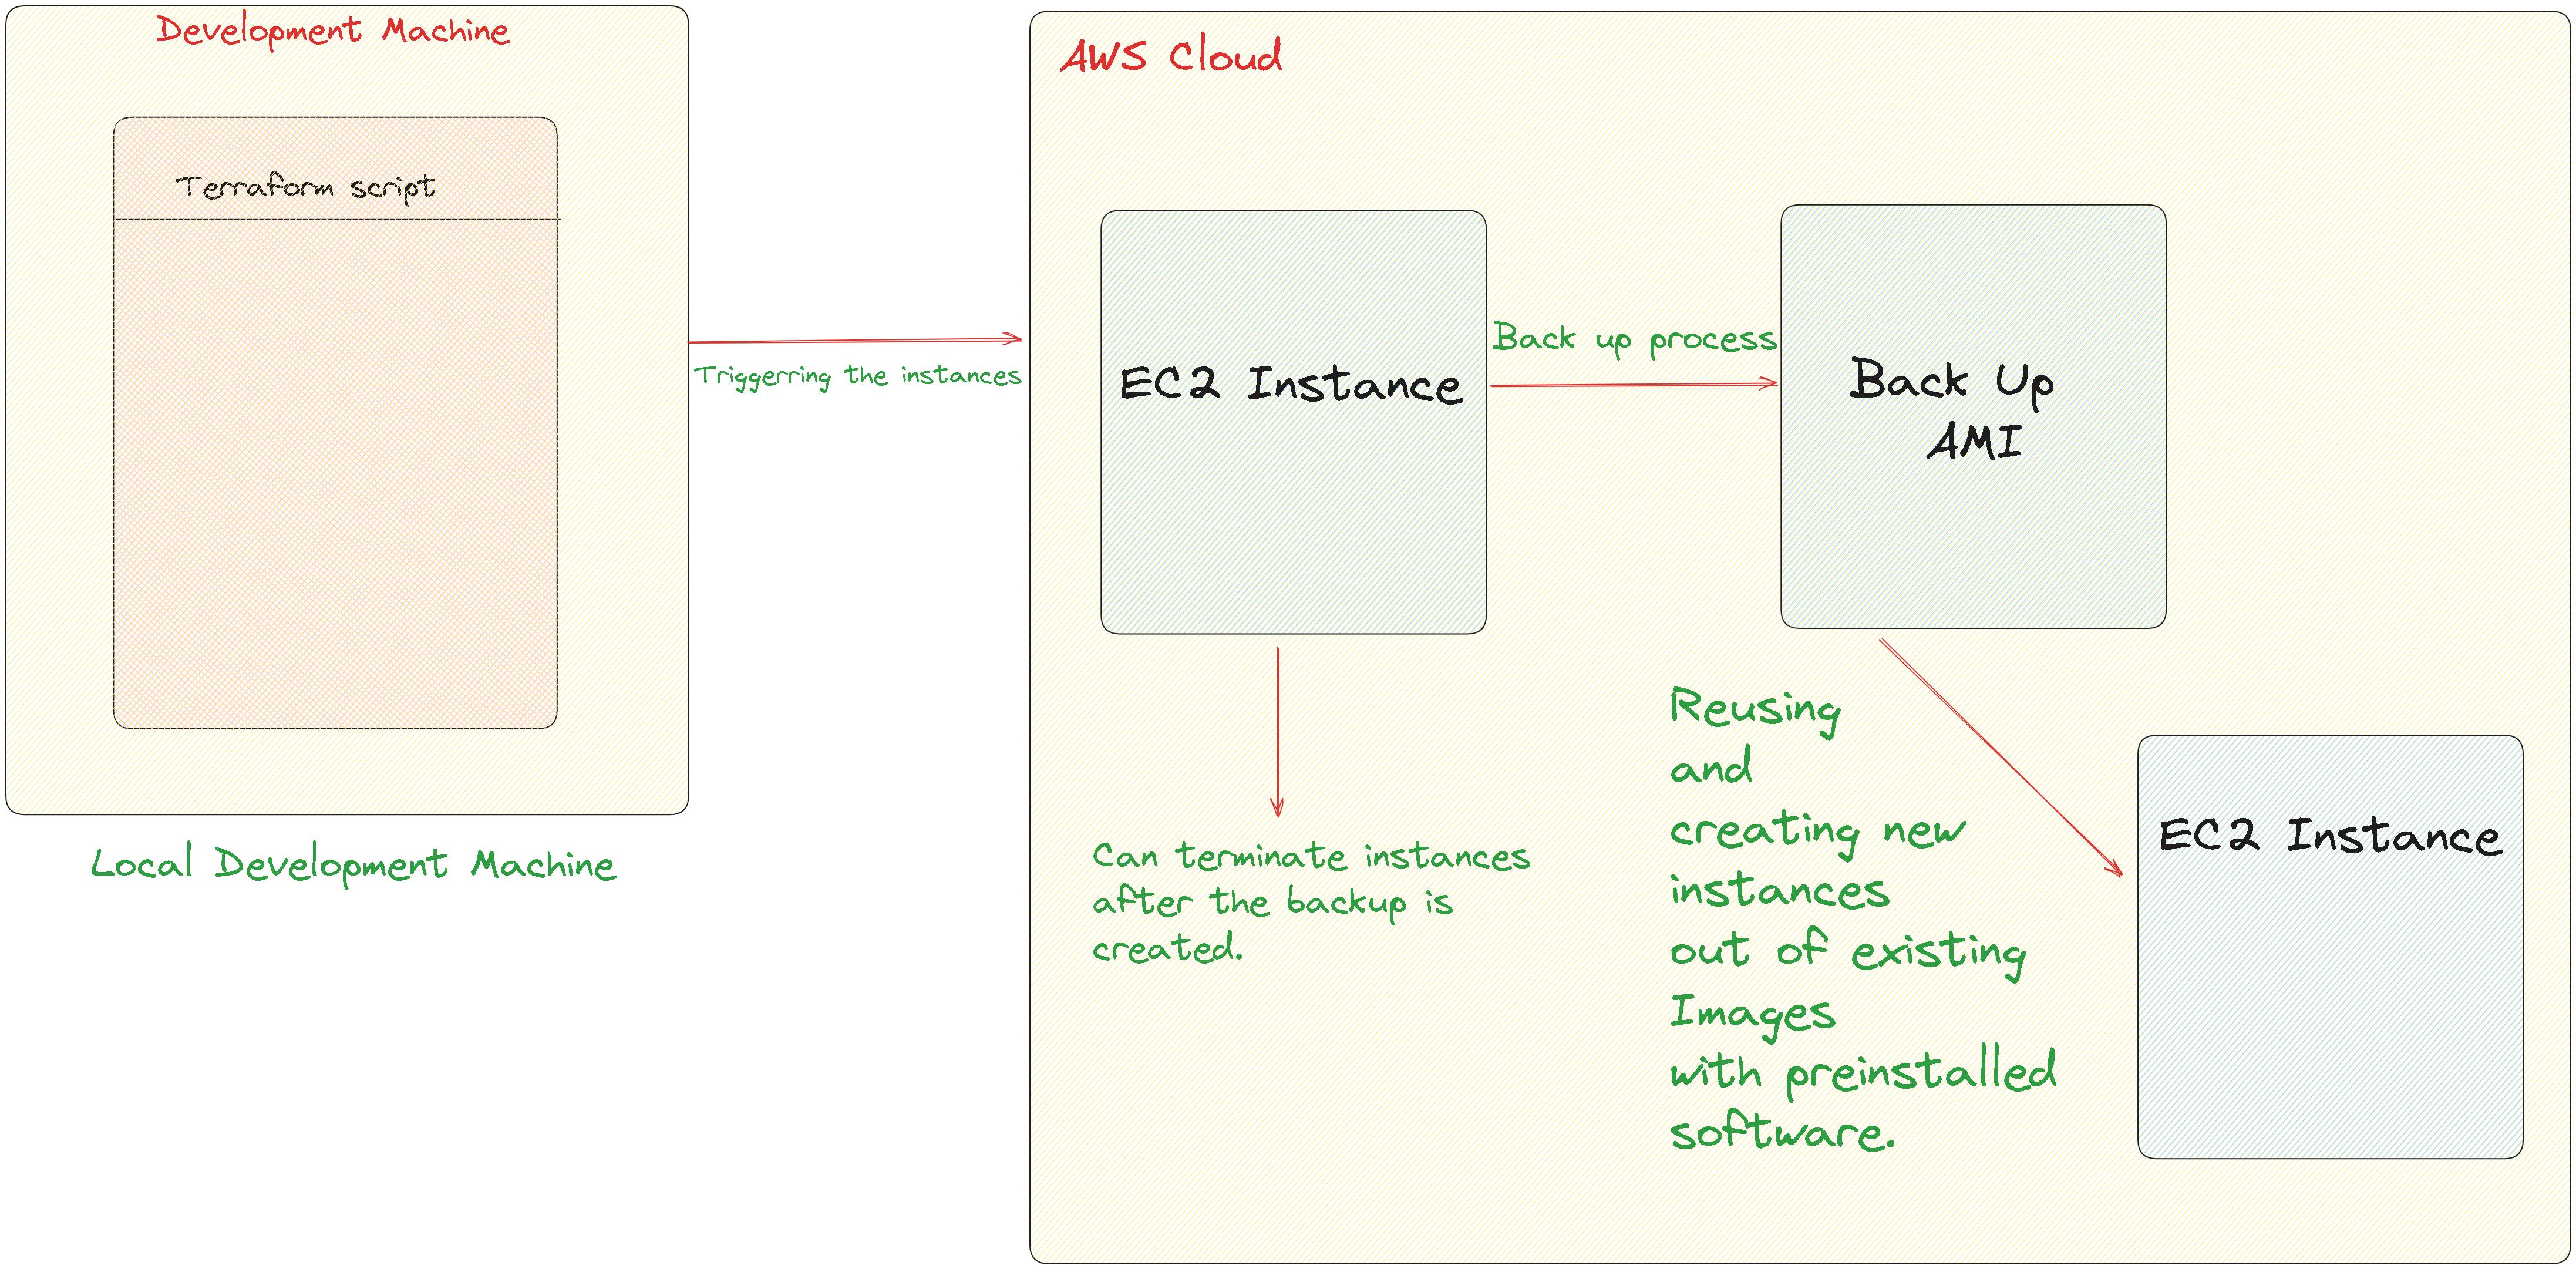
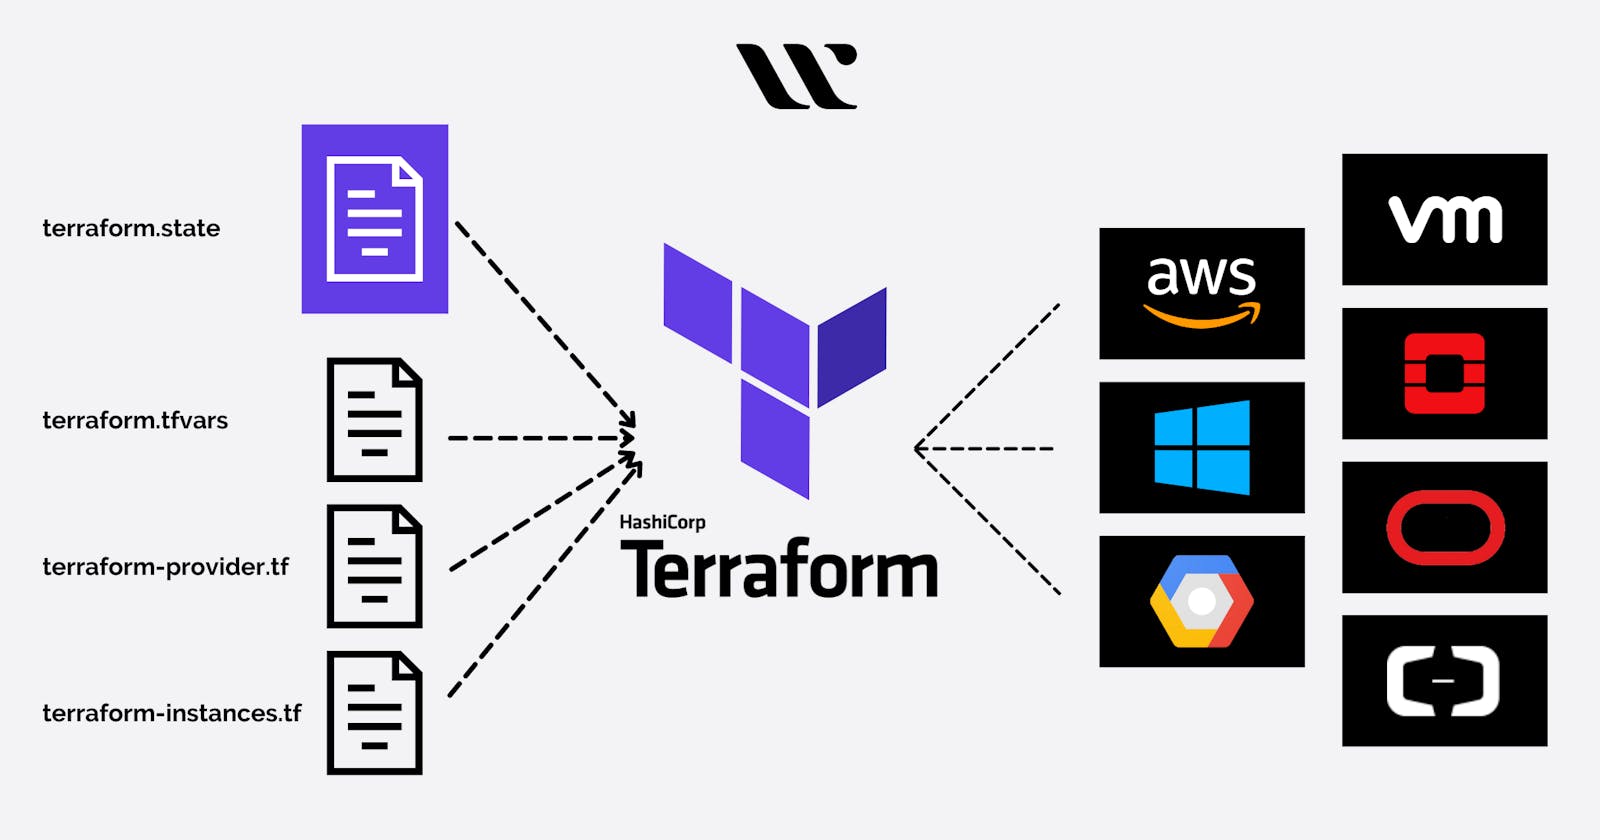
Image 3: Automated solution that helps in creating Cloud Instances through code.
PermalinkWhat is IAC (Infrastructure as Code):
Infrastructure as code is a methodology, that helps in provisioning cloud infrastructure using code. According to the literature, it is a part of the dev-ops process that helps in automating infrastructure provision using code. It helps in solving the repeatability problem, that arises in software engineering but in the context of infrastructure.
PermalinkWhy did I choose terraform:
Even though, there are multiple options like Pulumi, Puppet, Ansible. The only reason i have chosen terraform is, it has large community support for multi cloud approach. Also the number of organizations using it is comparably high, according to job openings in Linkedin till date. Thats the reason, I have chosen to use it. Moreover, I must write a section on Terraform in Thesis report.
PermalinkWhat you are gonna see in the next section:
1) Spinning a Sample Instance:
Describes the steps to spin up a sample instance.
2) Spinning a Spot Instance:
Describes the steps to spin up a spot instance and configure it for future workloads.
Installing Docker on Cloud VM
Backing up the existing Instance
PermalinkSpinning a Sample Instance:
Use the following code to spin a sample instance over AWS.
PermalinkTerraform Basics:
For the scope of this tutorial, one must understand a few terminologies in terraform.
a) Resources: As per terrraform ... Resources are the most important element in the Terraform language. Each resource block describes one or more infrastructure objects, such as virtual networks, compute instances, or higher-level components such as DNS records.
Example:
In AWS a resource could be any piece of hardware/service defined.
EC2 instance, S3, EMR cluster etc
b) Terraform commands:
Terraform init: Initializes the required modules
Terraform Validate: Check whether the configuration is valid
Terraform apply: Create or update infrastructure
Terraform show: Show the current state or a saved plan
Terraform destroy: Destroying previously created infrastructure.
Terraform state list: List the active instances from terraform.
PermalinkSteps involved:
Permalink1.Defining the configuration.
# This block of code fetches the required providers to execute the code-defined
# below. It's synonymous with importing libraries in a programming environment.
terraform {
  required_providers {
    aws = {
      source  = "hashicorp/aws"
      version = "~> 4.16"
    }
  }

  required_version = ">= 1.2.0"
}

provider "aws" {
  region  = "ca-central-1"
}

# To spin a sample instance one must use the aws_instance resource block.
# The block provisions a instance by fetching the following AMI-ID
# from the AWS.
resource "aws_instance" "app_server" {
  ami           = "ami-095819c19b51bc983"
  instance_type = "t2.micro"

  tags = {
    Name = "SomeServerInstance"
  }
}
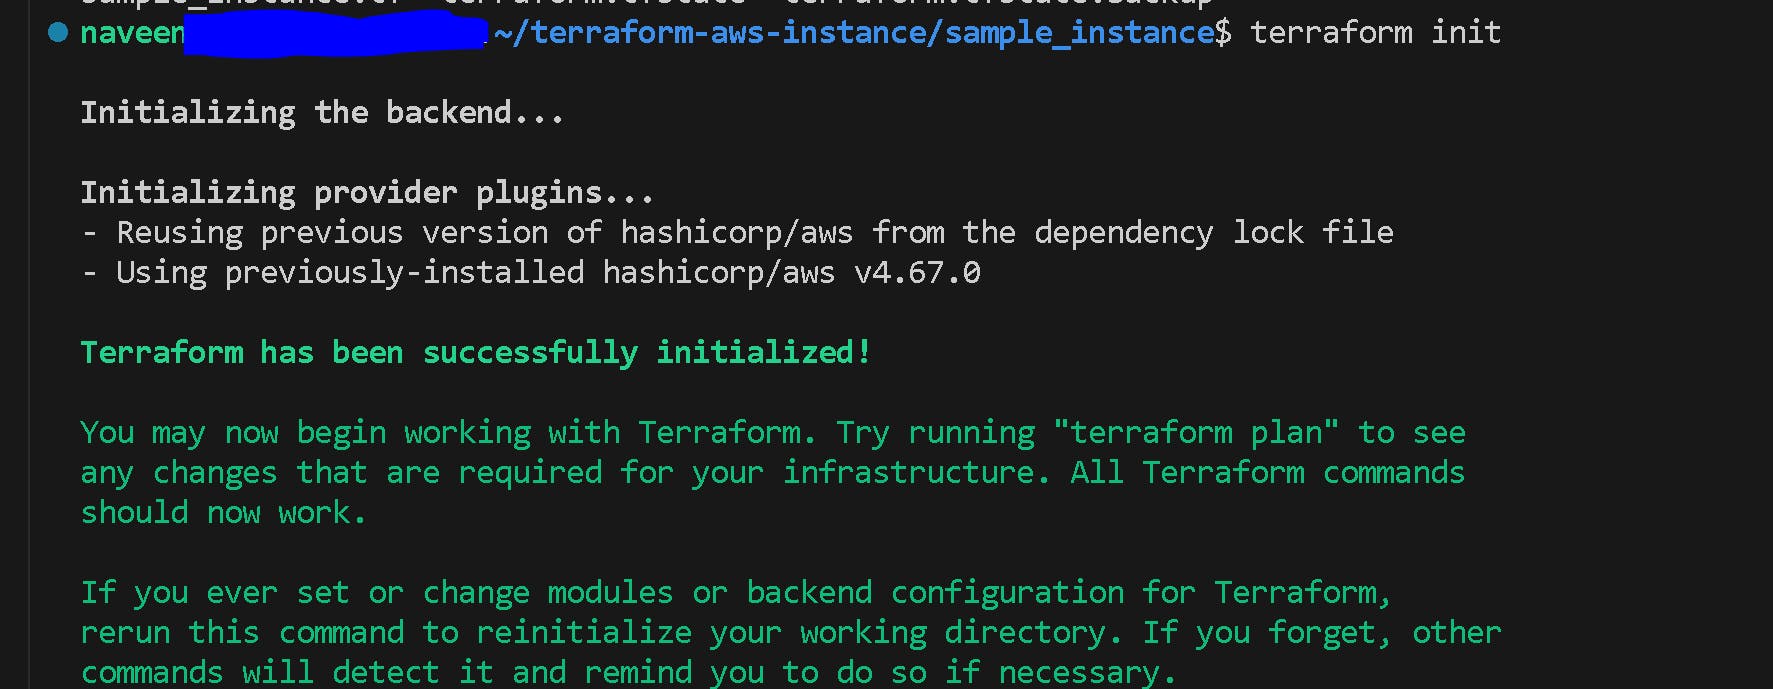
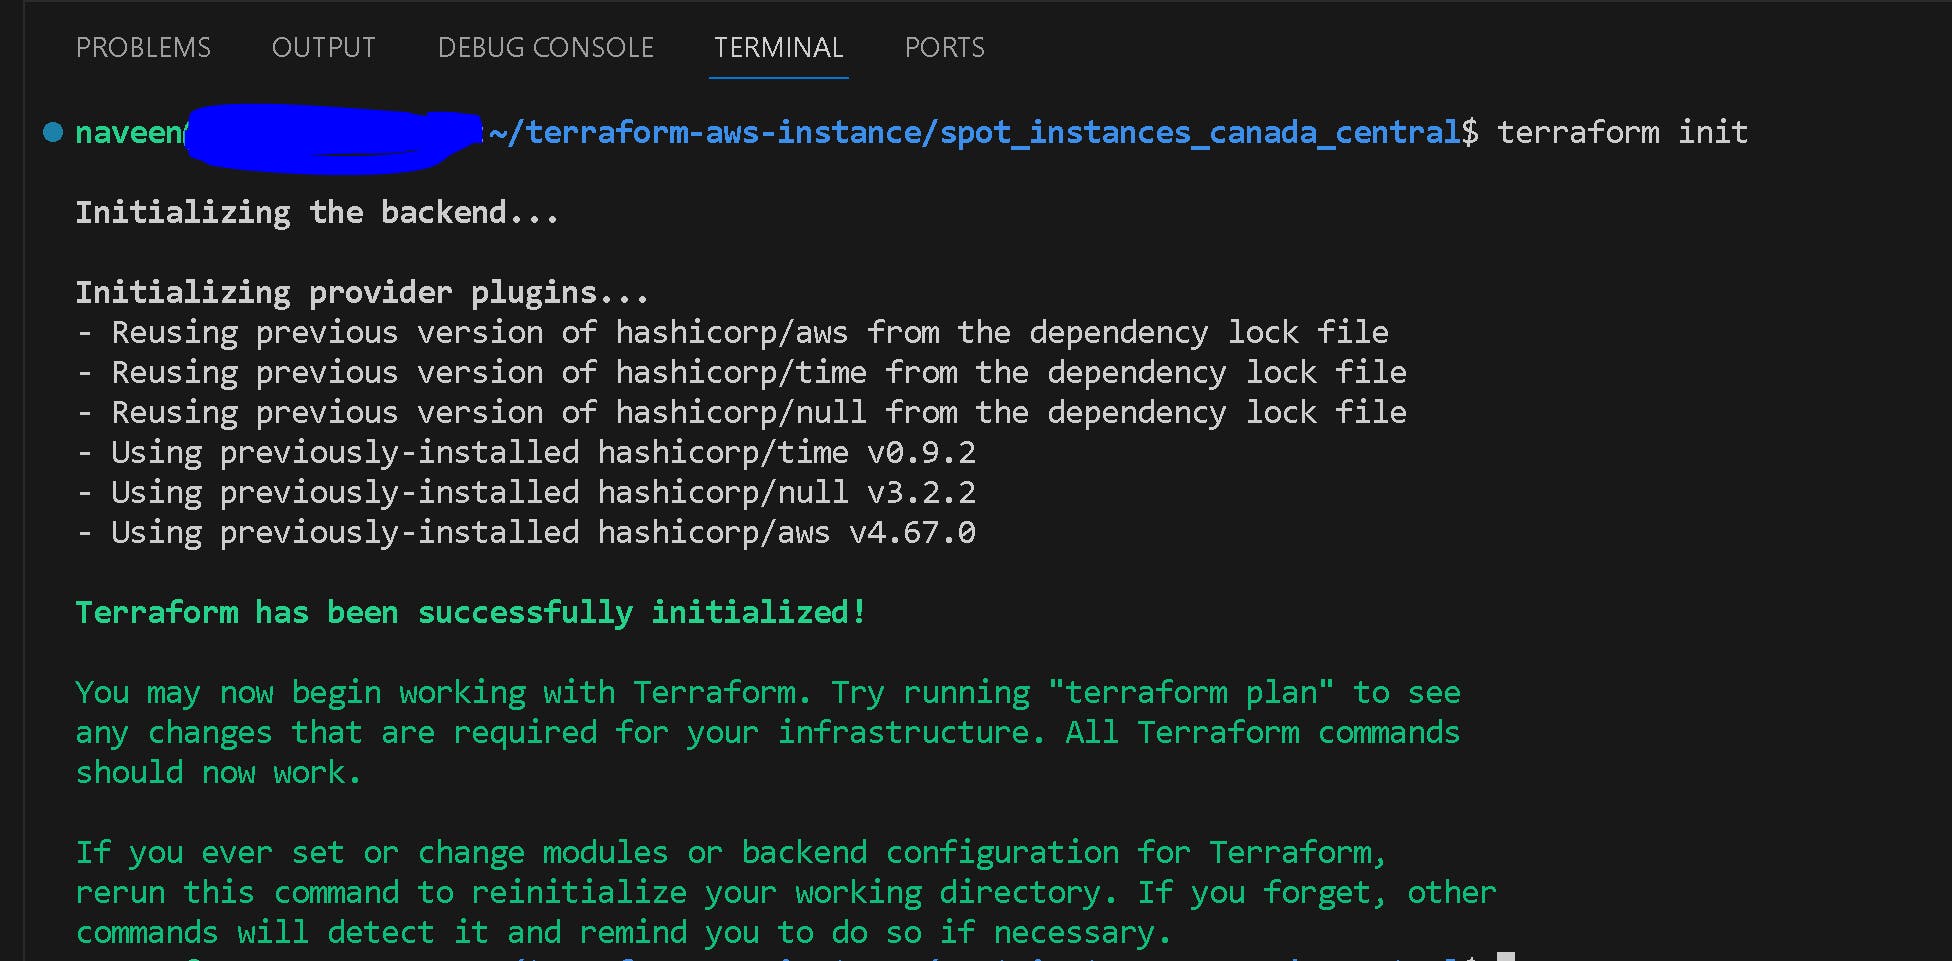
Permalink2.Initiate the terraform modules:
Before proceeding to execute the code on your local machine, one must perform the step of initializing the resource modules. Which will fetch the required modules required to execute the specific block of code.
terraform init
As per the below image the terraform initializes the aws modules.
This is a very important step, that everyone must do to proceed any further.
Permalink3. Validate the Configuration:
As the configuration is initialized, now we need to validate the configuration to verify if the code is valid or not. In our case as its sample code, the configuration will be valid.

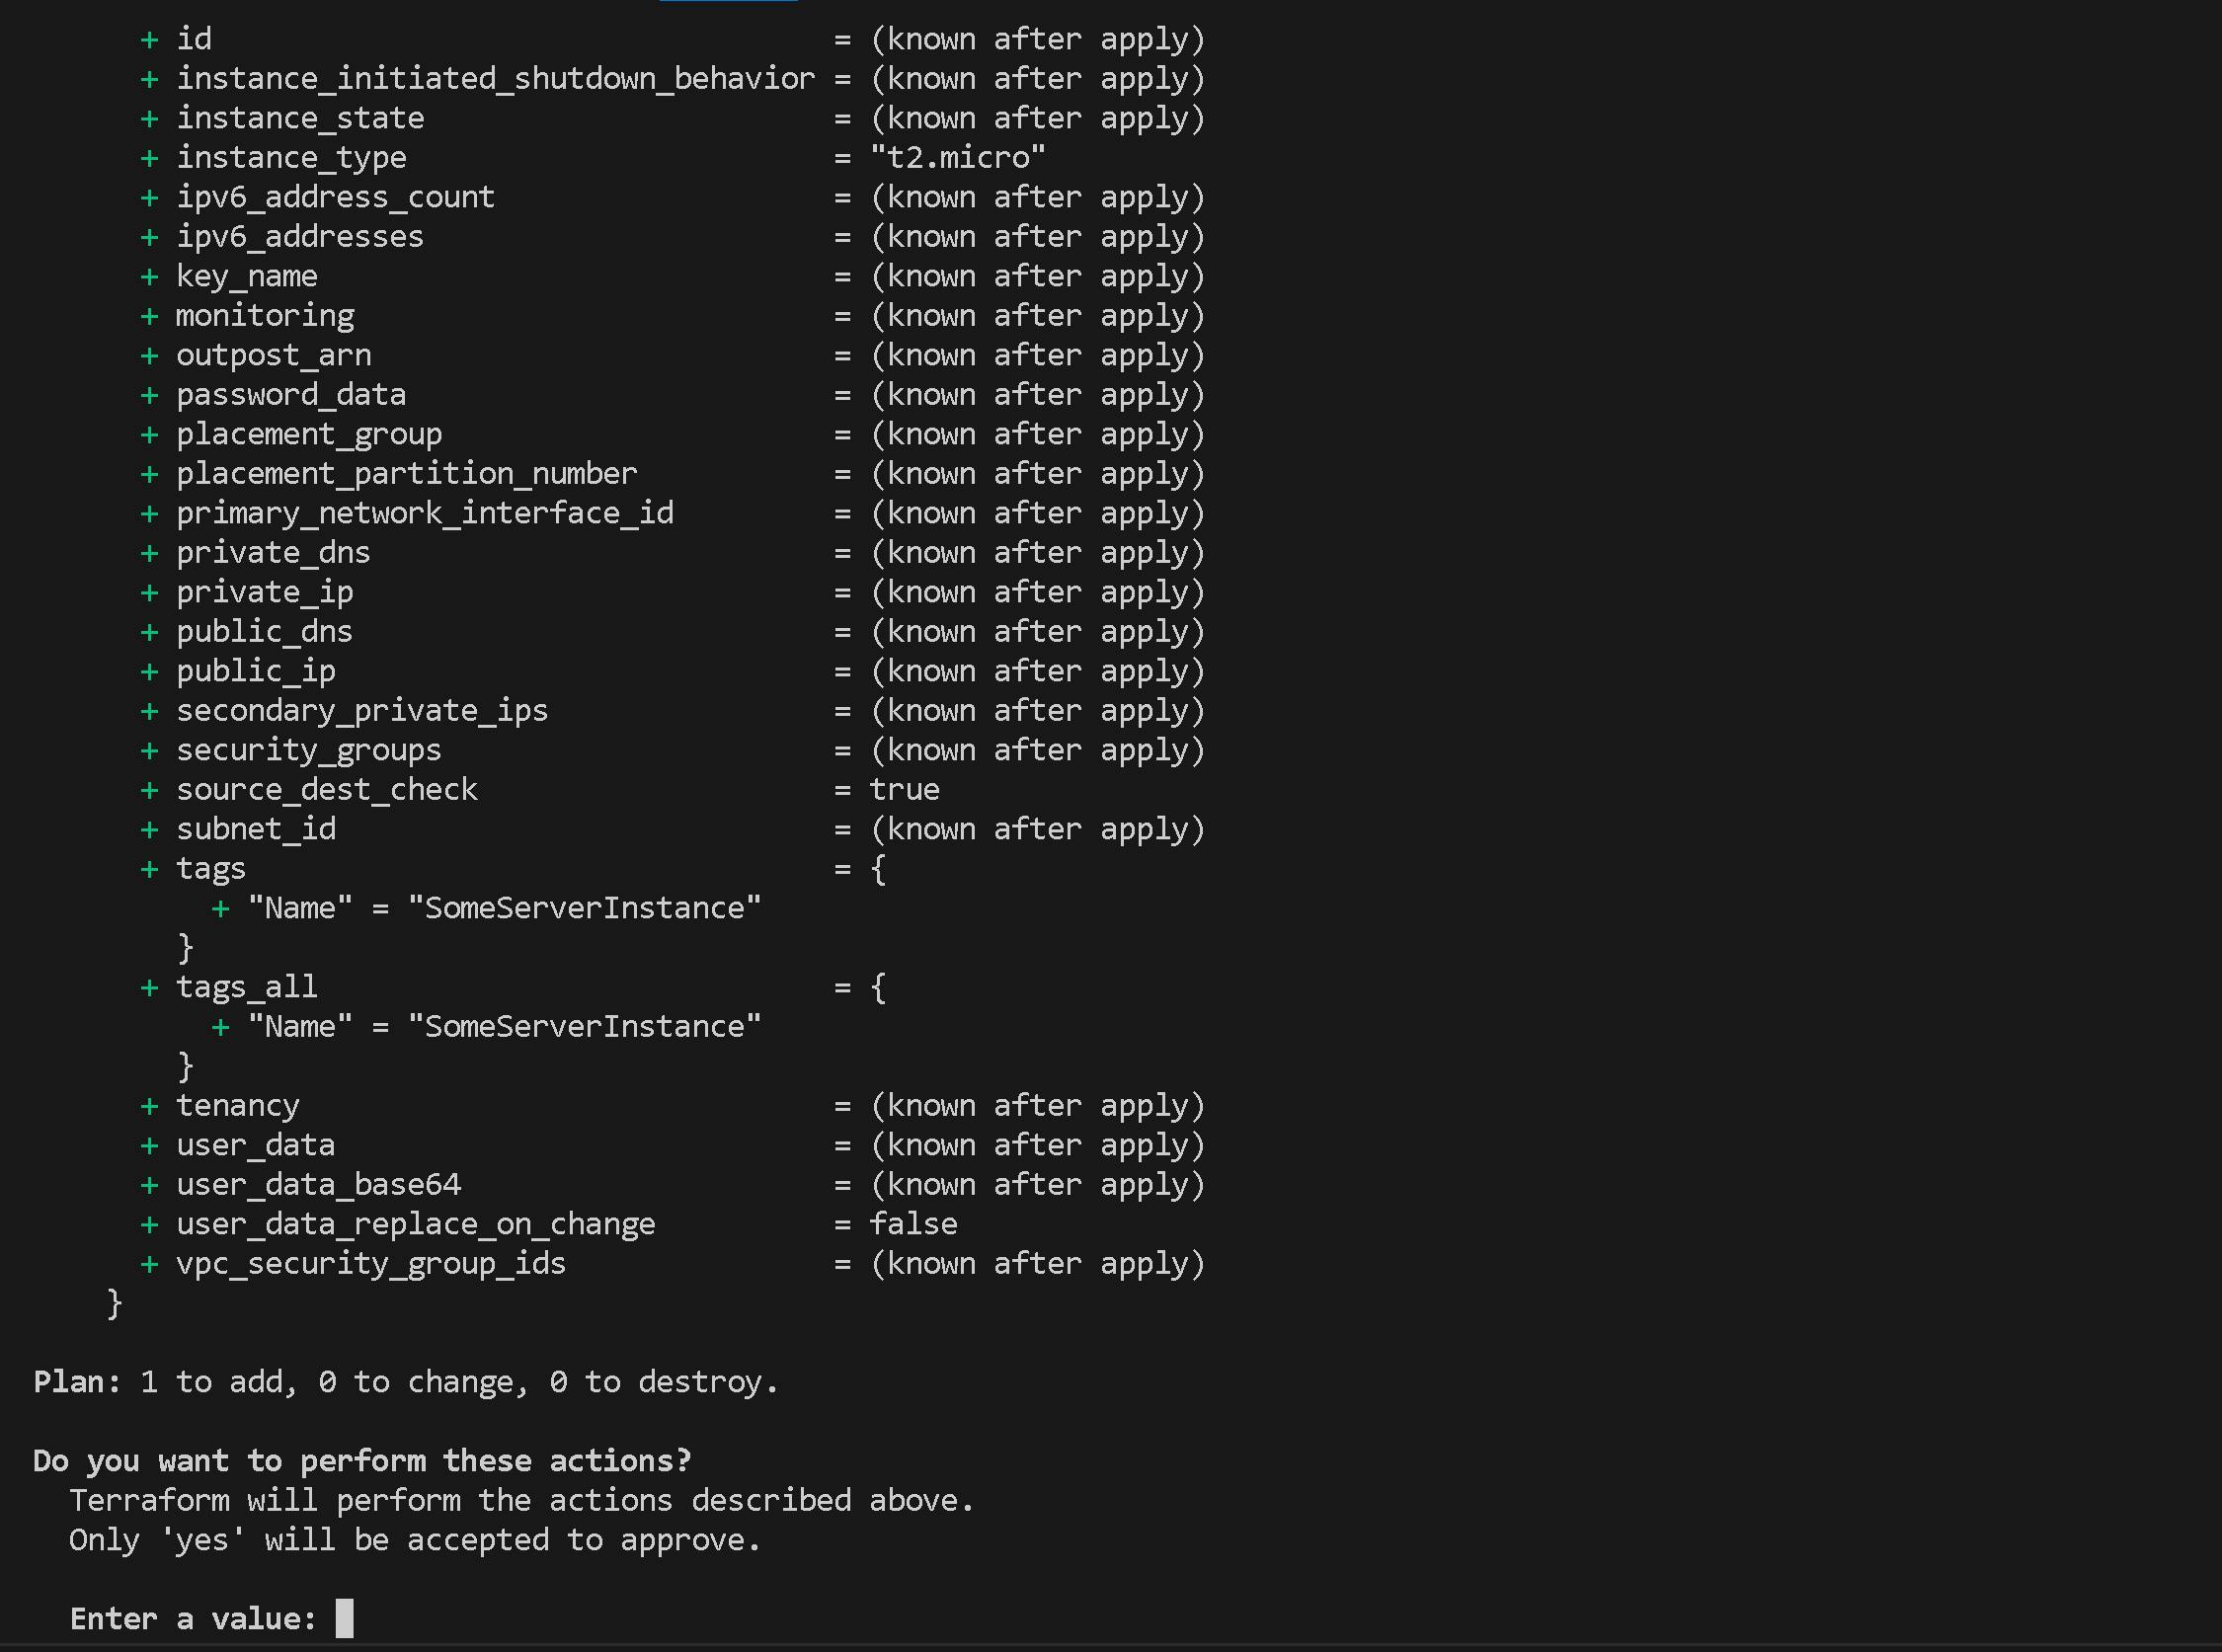
Permalink4. Apply the Configuration:
Once the validation step is completed, we must execute the apply command to spin up the instance remotely on the cloud.
terraform apply
After executing the above command in your console, we will get a plan that is generated by Terraform that is displayed on your console. One must press "yes" to proceed in generating the instance on cloud.
Even though if we don't mention any subnets and VPC's (Virtual Private Cloud). Terraform will choose the default ones for the infrastrcuture.
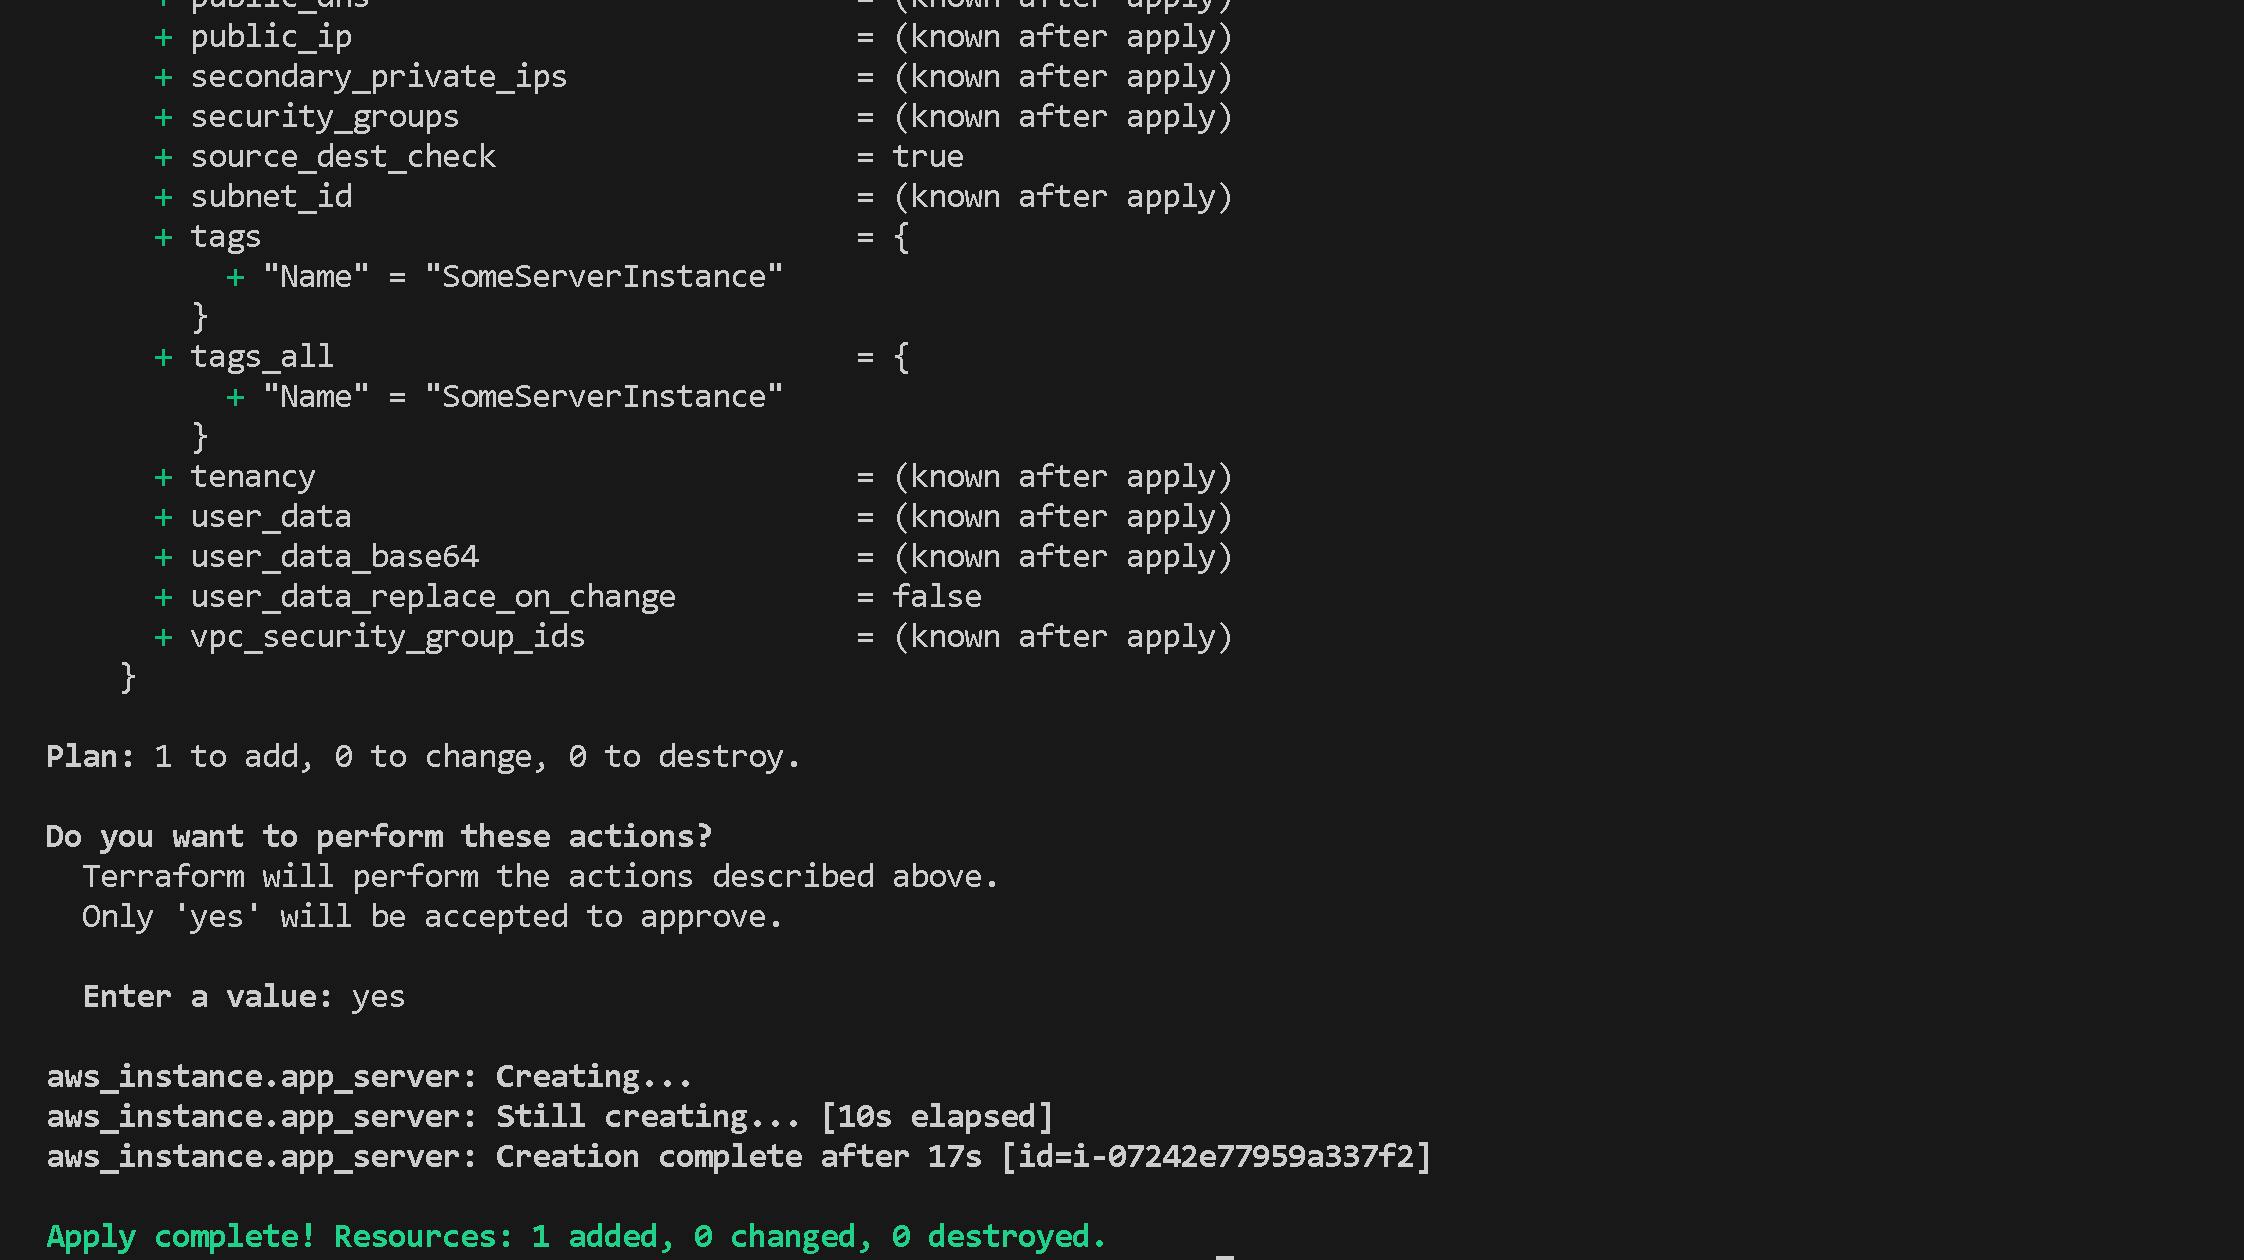
Permalink4. Verifying the Instances:
Once the instance is created, one must verify whether it's successfully running or not. In our case after the above step is executed the instance started to spin successfully.

Permalink5.Destroy the Instances:
Once the work is completed on the instance, we can successfully destroy it.
PermalinkSpinning a Spot instance:
In this section, you will see how to spin a spot instance. I assume most of the readers who are reading the content might not know what is a spot instance!
Spot instances: A special type of cloud instances that are offered for the cheapest price in the AWS cloud platform.
In simple terms, spot instances are the ones that are unused EC2 resources given to cloud users at a price less than on demand.
Caution: Never use spot instances for highly available computing environments. Because there is a possibility that AWS can take back the instances whenever AWS wants. (Basically when there is a demand spike from the other customers)
PermalinkBackground study:
The background study, required to spin up spot instances is completely distinct from normal instances. This is because the resource modules required to define spot instances are different from normal instances.
One must use the following resource block shown below or else provisioning spot instances is not possible.
resource "aws_spot_instance_request" "spark_spot_instance" {
}
The following is the tree directory of the files organized.
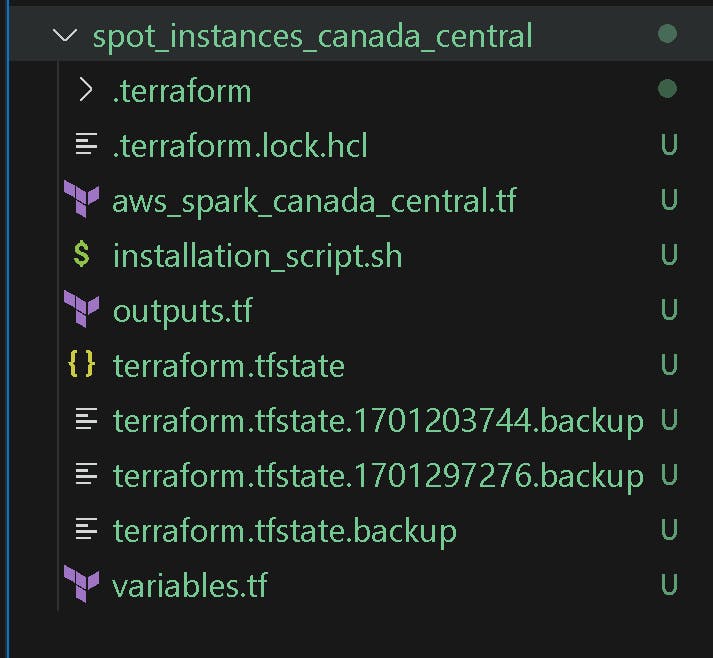
PermalinkCode to provision Spot instance without any additional software:
aws_spark_canada_central.tf
# fila name aws_spark_canada_central.tf
# Importing required Providers.
terraform {
  required_providers {
    aws = {
      source  = "hashicorp/aws"
      version = "~> 4.16"
    }
  }

  required_version = ">= 1.2.0"
}

provider "aws" {
  region  = "ca-central-1"
  access_key = "${var.access_key}"
  secret_key = "${var.secret_access_key}"
}

# Resource block to spin a spot instance
# One must use the following resource block only.
# With a bidding Spot price slightly above than the minimum price
# in that region.
resource "aws_spot_instance_request" "spark_spot_instance" {
  ami           = "${var.ami_id}"
  spot_price    = "0.18"
  spot_type = "persistent"
  instance_interruption_behavior = "stop"
  instance_type = "m5.2xlarge"
  subnet_id = "put_your_subnet_here"
  associate_public_ip_address = "true"
  key_name = "${var.key_name}"
  vpc_security_group_ids = ["put_your_security_group"]
  availability_zone = "ca-central-1d"

  # Specify block device mappings for the root volume and an additional volume
  root_block_device {
    volume_size = 150         # Size of the root volume in GB
    volume_type = "standard"  # Standard volume
    encrypted = true          # Encrypting Volumes

  }

  tags = {
    Name = var.instance_name
  }

}
# file name
# variables.tf
# it contains all the variables used in the terraform

variable "instance_name" {
  description = "Value of the Name tag for the EC2 instance"
  type        = string
  default     = "Apache Spark With docker"
}

variable "linux_spot_price" {
  type        = string
  default     = "0.15"
}

variable "type" {
  type        = string
  default     = "persistent"
}

variable "instance_interruption_behaviour" {
  type        = string
  default     = "stop"
}

variable "ami_id" {
  type        = string
  default     = "your_ami_id"
}

variable "wait_for_fulfillment" {
    default = "false"
}


variable "key_name" {
    default = "your_instance_key_name"
}

variable "access_key"{
  default = "your_access_key"
}

variable secret_access_key {
  default = "your_secret_access_key"
}
Follow the above steps defined in part 1, to initialize the modules and provision the infrastructure.
terraform init
terraform apply
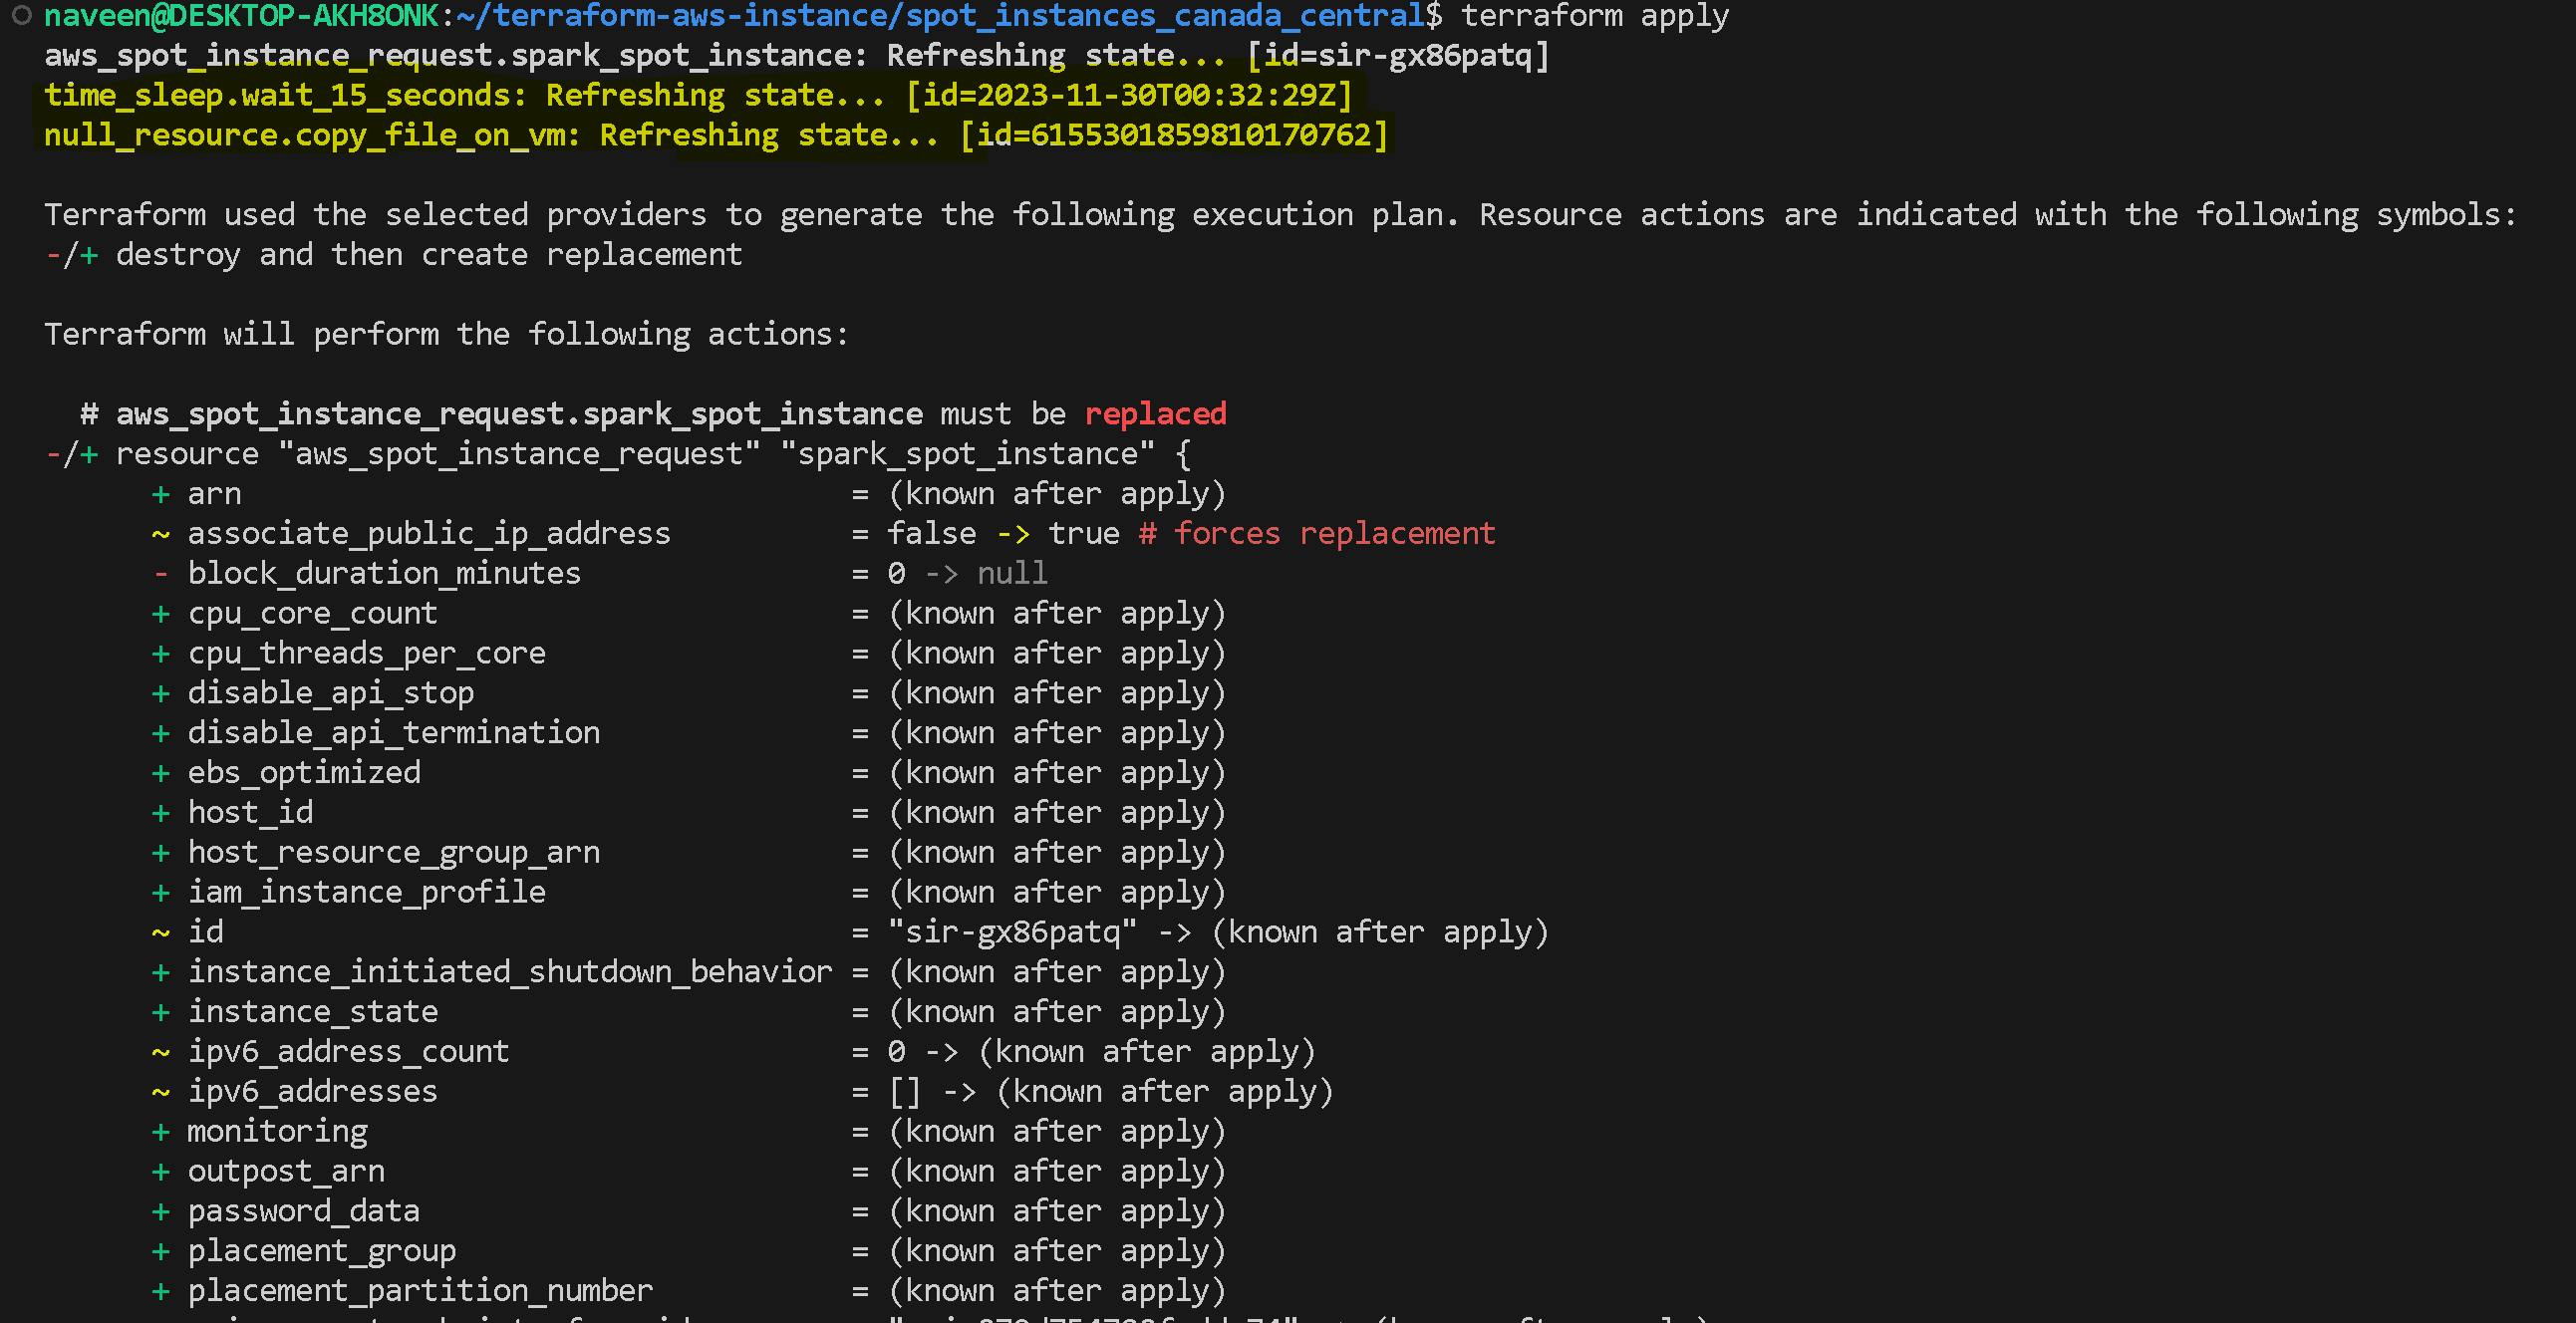
The text shaded in yellow resembles the piece of other code that I was experimenting with please ignore those logs.
Also for the purpose of blog, I tried to reprovision the instances that would replace the existing ones.
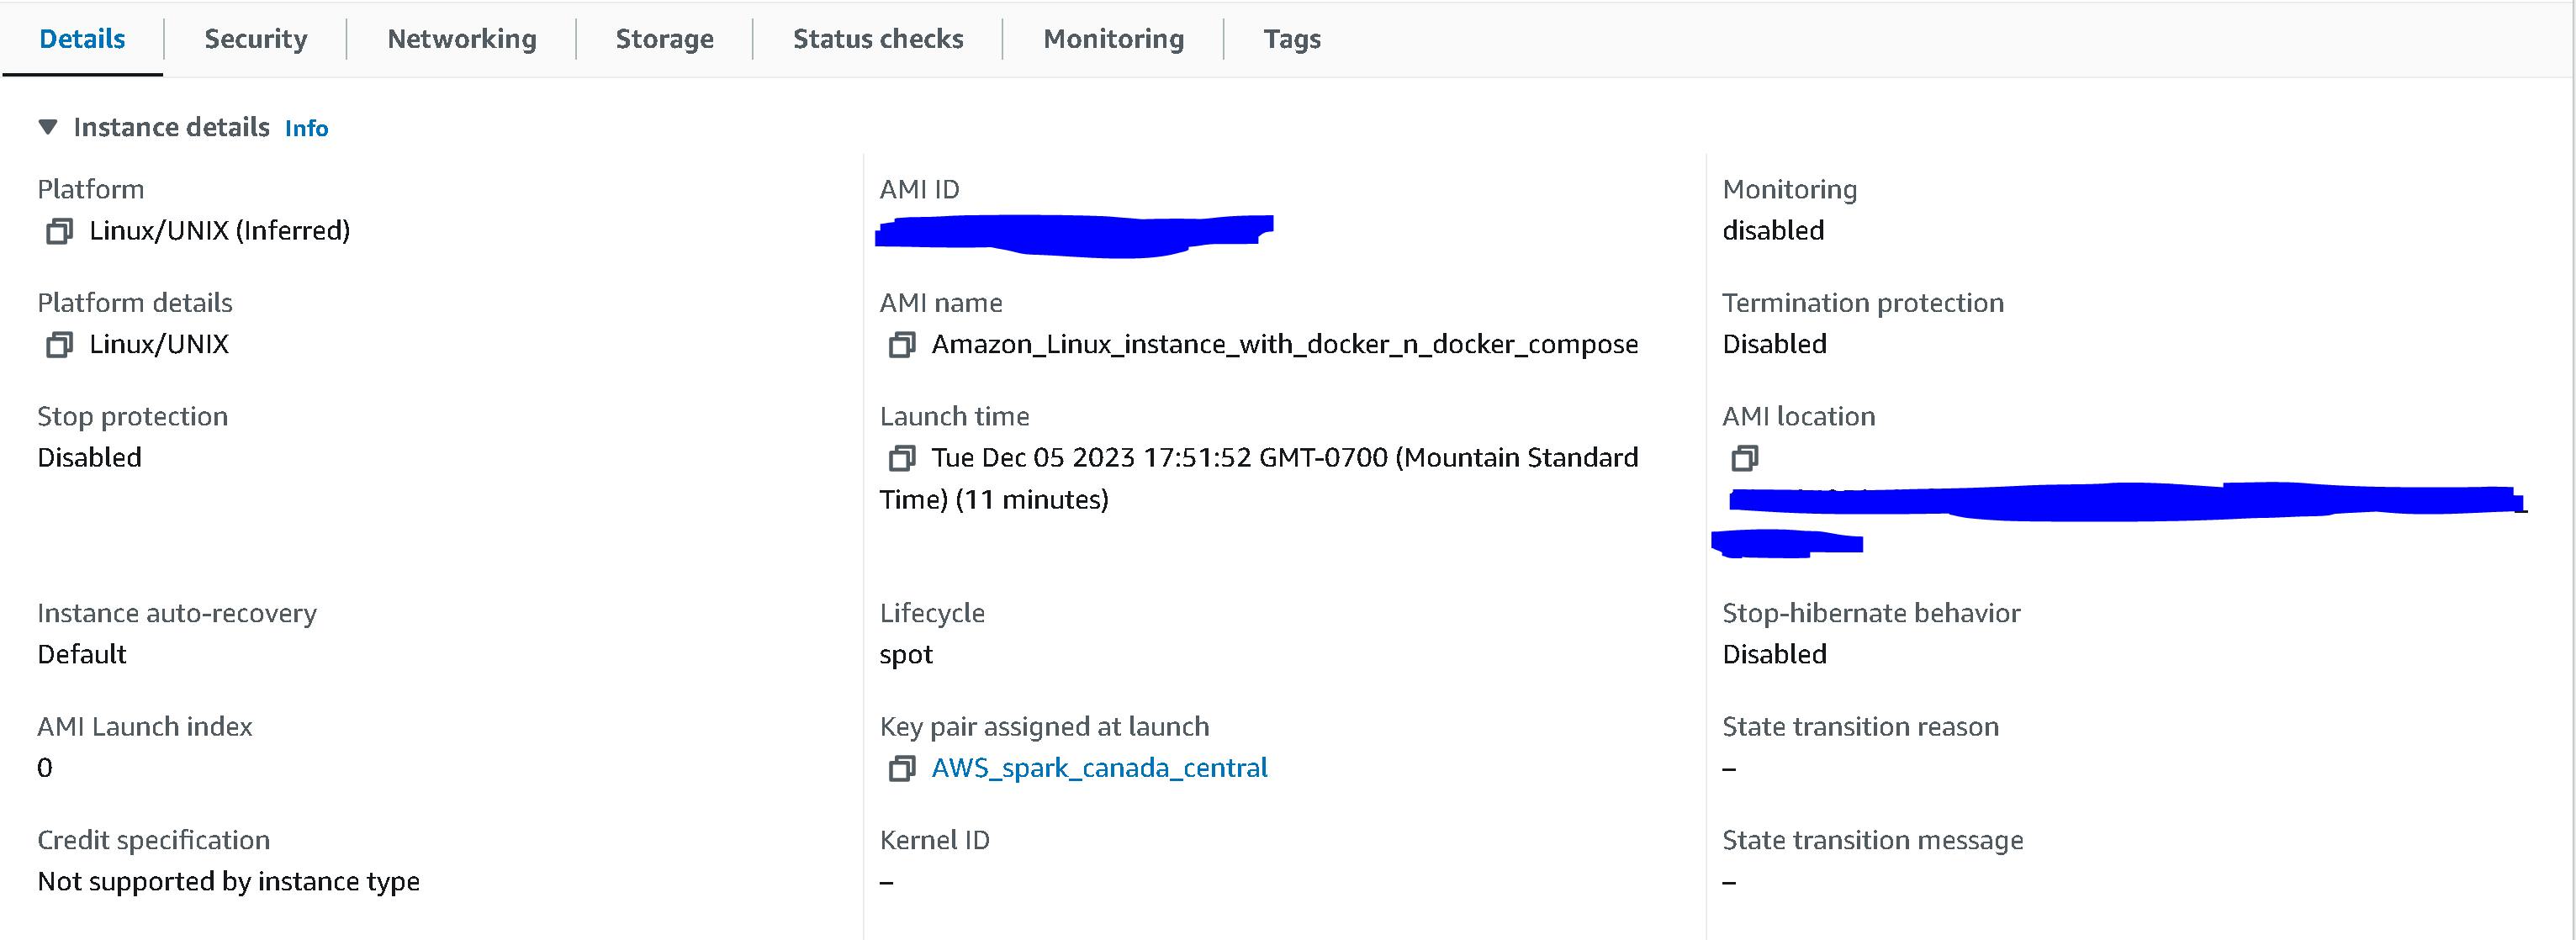
PermalinkResult after execution of above commands:

The way to verify if the spot instance is provisioned is to verify using the web page details section.
PermalinkWhat I have done from here?
Now, as the spot instance provision is completed. I installed docker and docker-compose on top of the EC2 Virtual machine using command line. Later I exported the configuration as a new custom AMI which contains docker and docker-compose software.

From now on whenever I want to spin up instances that need docker. I can use the custom image AMI_ID and can spin up new spot instances using terraform code immediately.
PermalinkInference ~
This technique has reduced a lot of manual effort in my project for continuously provisioning new instances and installing custom software again and again.
Overall, my instance automation for having custom software installation has helped me reduce a lot of time in my thesis project to set up infrastructure for very large databases.
I hope this blog has helped readers learn about something new regarding terraform and its need in infrastructure automation💖. Moreover, I will also continue to post a series of blogs every week based on the tasks that I work on for my thesis project.